How to Restore a Rolled Asphalt Roof: A Step-by-Step Guide
An aging roof doesn't always mean it's time for a complete replacement. With the right preparation, products, and application process, many existing roofs can be restored with a protective coating system designed to help extend their service life.
In this project, we're walking through the restoration of a rolled asphalt roof using two of our most popular roofing products: Blue Max® Original Blue Liquid Rubber Waterproofer and Maximum-Stretch® Elastomeric Roof Coating.
The goal? Create a flexible, seamless waterproofing membrane over the existing rolled roofing, then protect it with a durable, UV-stable topcoat.
We'll take you through the entire process, from the roof's original condition to the final coating, and explain why each step matters.
Here's the five-step restoration process (in a nutshell):
- Prepare and clean the existing rolled asphalt roof.
- Apply the first coat of Blue Max® and allow it to dry completely.
- Apply the second coat of Blue Max® and allow it to dry completely.
- Apply the first coat of Maximum-Stretch® and allow it to dry completely.
- Apply the second coat of Maximum-Stretch® and allow the finished coating to dry and cure.
Whether you're a professional roofing contractor, property manager, or hands-on DIY homeowner, this project offers a look at how a multi-layer elastomeric roof coating system comes together.
Step 1: Preparing the Rolled Asphalt Roof
Before the restoration: A look at the existing rolled asphalt roof prior to surface preparation and coating.
Before applying any roof coating, it's important to determine whether the existing roof is a good candidate for restoration.
The roofing material should be structurally sound, securely attached, adequately drained, and capable of supporting a new coating system. Severely deteriorated sections, trapped moisture, and damaged underlying materials should be repaired or replaced before coating begins.
A liquid-applied roof coating can help protect an existing roof, but it is not a substitute for necessary structural repairs.
With a suitable surface identified, it's time to begin preparation.
Clean the Roof Surface
Begin by removing loose debris, dirt, leaves, moss, and any loose roofing granules.
A broom or suitable brush can help clear material from the surface. For this roof, a leaf blower was the perfect tool to keep fall foliage off the roof. If additional cleaning is required, take care not to damage the existing rolled roofing. Aggressive pressure washing can dislodge granules or force water beneath damaged roofing.
If water is used during cleaning, allow the roof to dry completely before beginning the coating process.
Coating over trapped moisture can interfere with adhesion and create problems beneath the finished membrane.
Inspect Seams, Edges, and Penetrations
Next, inspect the roof for areas that may require additional attention.
Pay particular attention to:
- Overlapping seams between sections of rolled roofing
- Roof edges and transitions
- Flashing around penetrations
- Cracks, punctures, and damaged areas
- Loose or deteriorated roofing material
- Areas where standing water may collect
Don't Forget the Details: Blue Max® Trowel Grade
Before applying your first coat of Blue Max® Original Blue, it's important to address any cracks, gaps, seams, and other problem areas. Blue Max® Trowel Grade is a thick, flexible liquid rubber waterproofing compound designed to fill and seal cracks and gaps up to 5/8 inch wide. Ideal for use around roof penetrations, flashing, joints, and other vulnerable areas, it can be applied with a trowel or putty knife to create a protective waterproof seal. For best results, allow Trowel Grade to dry for 24 hours before applying Blue Max® Original Blue over it.
Step 2: Applying the First Coat of Blue Max® Original Blue
Application tip: Plan the project around favorable weather. Ames roof coatings are generally best applied to warm, dry surfaces between 50°F and 90°F, with low humidity and suitable separation between the surface temperature and dew point.
Application tip: Plan the project around favorable weather. Ames roof coatings are generally best applied to warm, dry surfaces between 50°F and 90°F, with low humidity and suitable separation between the surface temperature and dew point.
Begin applying Blue Max® to the properly prepared roof using an appropriate roller, brush, or compatible airless sprayer. On this day it was too windy to spray, so the team rolled on the Blue Max® instead
Work methodically across the surface, maintaining consistent coverage and paying close attention to seams, edges, and areas that may be more difficult to reach. Blue Max® is applied at approximately 1 gallon per 100 square feet per coat, although actual product requirements may depend on the roof condition, surface texture, and specified coating system.
The goal is to create an even, continuous layer without skips or exposed areas that could compromise the membrane.
Allow the First Coat to Dry Completely
Once the first coat has been applied, allow the Blue Max® to dry thoroughly before proceeding. Blue Max® goes on a lighter blue and becomes darker as it dries, providing a helpful visual indicator of the drying process.
However, color change alone should not replace checking that the material is sufficiently dry for recoating. Blue Max® may be ready to recoat in as little as four hours, but additional drying time may be necessary.
Step 3: Applying the Second Coat of Blue Max®
With the first Blue Max® layer fully dry, it's time to build on the waterproofing membrane. A second coat adds thickness to the membrane and helps improve consistency across the roof.
The wind had died down, so the application team were able to break out the sprayer for this, making the application process faster. We recommend using Graco sprayers. This project used a Graco 833.
We are always happy to answer any questions, get in touch with our Customer Service team for help:
1-888-345-0809
customerservice@amesresearch.com
Let the Second Coat Dry Completely
Before applying Maximum-Stretch®, the second coat of Blue Max® must be fully dry and suitable for topcoating. Applying a topcoat too early can interfere with proper film formation, adhesion, and the overall performance of the coating system.
Inspect the surface for wet spots, soft areas, or locations where the coating may have been applied more heavily. Once the Blue Max® membrane has dried sufficiently, the roof is ready for its UV-protective finish.
Step 4: Applying the First Coat of Maximum-Stretch®
With the Blue Max® basecoat complete and dry, we're ready to transition to our UV-stable topcoat, Maximum-Stretch®. While Blue Max® provides the underlying waterproofing membrane, Maximum-Stretch® has 88% light reflectivity. The bright white finish reduces surface temperatures resulting in lowered cooling costs..
Its elastomeric properties (650% elongation) allow the coating to expand and contract with the existing roof surface, helping reduce the likelihood of cracking and peeling.
Applying the First Maximum-Stretch® Coat
Apply Maximum-Stretch® over the fully dried Blue Max® membrane.
Work in manageable sections, maintaining consistent coverage and creating a smooth, continuous coating. Like Blue Max®, Maximum-Stretch® can be applied with a brush, roller, or suitable airless sprayer.
As with the basecoat, avoid spreading the material too thinly. Proper coating thickness is essential to achieving the intended protective performance.
Allow the First Topcoat to Dry Completely
After applying the first coat, allow Maximum-Stretch® to dry before applying the second.
Maximum-Stretch® can dry in approximately two to eight hours under certain conditions, but 24 hours between coats is recommended. Cooler temperatures, higher humidity, and thicker applications can extend drying time.
With the first Maximum-Stretch® layer in place, the roof is taking on its finished appearance. But one more coat is needed to complete the system.
A SIZE FOR EVERY JOB - BIG OR SMALL
Step 5: Applying the Second Coat of Maximum-Stretch®
It's time for the final application!
The second coat of Maximum-Stretch® completes the two-coat topcoat system and helps achieve the required coating thickness.
Just as the second Blue Max® application builds on the waterproofing base, the second Maximum-Stretch® coat builds on the roof's protective exterior finish.
Completing the Protective Roof Coating
Apply the second Maximum-Stretch® coat evenly across the entire roof, checking that all intended areas receive adequate coverage. Take additional care around transitions, seams, penetrations, and roof edges.
Once the second coat is complete, the roof has received:
- Two coats of Blue Max® Original Blue as the liquid rubber waterproofing basecoat
- Two coats of Maximum-Stretch® as the flexible, UV-stable protective topcoat
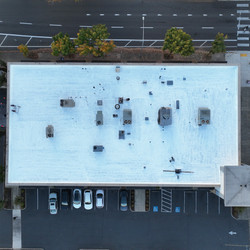
The result is a multi-layer, liquid-applied roof coating system that protects and maintains the existing rolled asphalt roof.
Full Video of The Process
Conclusion
A successful roof restoration is about more than putting a coating on an old surface. It requires proper preparation, durable products, adequate coating thickness, and patience during every drying stage. Ames roof coatings get you jumpstarted on that process.
From the first application of Blue Max® to the final coat of Maximum-Stretch®, each coat contributes to a roof coating system designed to help protect the building against moisture and weather exposure. Ames offers roof coating solutions for a wide range of applications.
Shop our roof coating products today: